Blog Archive

Showing posts with label before and afters. Show all posts

the importance of a concept

Designing and decorating a room requires creativity and vision, and this can sometimes be even tougher when redecorating. It is easy to hit an inspiration roadblock when looking at an existing room with existing furniture, and getting off track in the middle of the project can often happen. That's why it is so important to map out a concept for the room from the beginning. Creating a design board with the colours and furniture you will use allows you to constantly go back and be reminded of the feel and mood you are trying to achieve. I always start with something that the homeowner loves, and use that as a jumping off point. It might be fabric in a favourite colour, a piece of art, or a decorative accessory.

Here is an example of a recent project I did, which I posted about this week. This was a master bedroom refresh, using much of the existing furniture. The design board shows the colours and feel we were going for, and although some things were tweaked, it kept us on track and the outcome was what we wanted.
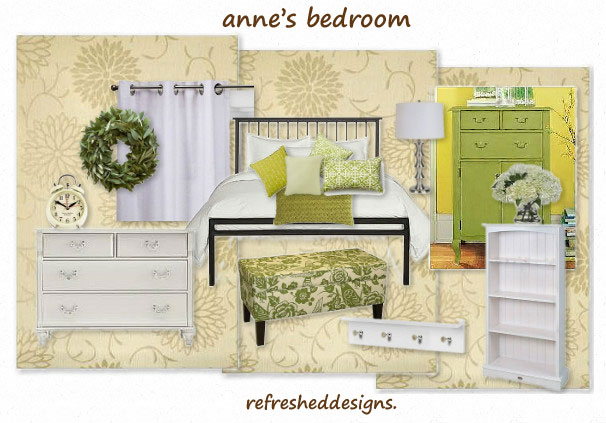


If you would like to have a design board created for a room you would like to refresh, go to my online refresh page. I would love to help out!


master bedroom refresh

Well I"m back in Calgary after two fantastic weeks on the East Coast at "home" visiting family and friends. I was busy while there, and one of the projects was refreshing my mom and dad's bedroom. The budget was slim to nil on this one, so I had to get the creative juices flowing. I started with wallpapered walls and a lovely wood floor, a bed with black iron-look head and foot board, and two tired old dressers. And it was quite dark, with only one window facing east.

I was very excited to see what was possible by using the sustainable design concept of reusing and re-purposing. Here is the before picture...


And after...


I wanted to create a brighter, lighter feeling country bedroom. The dresser below was painted a dark sage green (see my previous post on painting the dressers in this room). The curtains were an old shower curtain cut in two to make panels.


Everything on the walls and shelves was either something already in the house or from the yard outside. Birch branches are leaned against the wall as a point of interest and to cover up a bad crack in the wall underneath the wallpaper.


This is the second painted dresser with matching grey-green paint on the back of the existing shelves.


Jewellery is displayed on an old picture frame with a ribbon tied across the back.


The head and foot boards were painted with white semi-gloss trim paint and then distressed with sandpaper.


This bench was an old deacon's bench. We sawed off the back spindles and side arms, painted it out white, and made a foam cushion for the top.


The side table is a block of firewood sawed and sanded with a Varathane finish. 


Snowshoes complete the country feel and were found in the basement, so again, no extra cost for decoration.


This project cost only $100 dollars - for paint and fabric for the cushions. The rest was all re-purposed and reused.  I'm pleased with it, and so are my parents. What do you think?

Stay tuned for more budget-friendly refreshed rooms- including the bathroom and kitchen.

a tale of two dressers

I've been busy while on vacation working on refreshing a few rooms for family and friends. These two dressers were old pieces that were useful, but not very pretty in a master bedroom. Nothing a little paint can't fix! 

I gave this tired old dresser a good sanding, then primed and painted on two coats of a greenish-gray latex Behr paint (I actually didn't like the beige-gray colour that I had picked out, so did some custom mixing by adding some black and dark green paint I had left over from a previous project).  I then sanded the edges to give it a distressed look and let some of the wood come through, and added new hardware. Voila!


On the tall dresser I spray-painted  a high gloss sage green Rustoleum after a little sanding and a coat of primer. I finished off with 3 coats of water-based high gloss Varathane.


I'm pretty happy with how they turned out, and I will show you how they fit in the the refreshed master bedroom in my next post.  For now I'm off to paint more furniture. I wonder if my mom will let me at her hutch yet...

I'm also linked up on:

green idea: save old bathroom tile

So you're tackling a reno on a bathroom that looks like it belongs in a highway rest stop. In the '60's. Before you swing the sledgehammer, stop and really take a look at all of the individual elements in the room. Can anything be saved? Take a close look at the floor tiles. They may be a garish colour and look horrible with the pink tub, but picture them in a new and modern room. Will they actually work? The answer is often, surprisingly, yes. Retro tiles in unusual patterns and colours are making a comeback, and look great with contemporary fixtures and a neutral colour scheme in the rest of the room.

Take a look at this bathroom reno featured in Country Living. Simple and cost-efficient.


And this one by Rachel at Just a Touch of Gray.  Love the blue floor in the renovated room.


Here are some other  great examples of refreshed bathrooms with vintage floors.

via Country Living


via Apartment Therapy

Gast Architects: Projects traditional bathroom

Slow down and think twice before demo day. Sustainable choices can be stylish!