Blog Archive

Showing posts with label country decorating. Show all posts

decorating according to home style - a home done right

In yesterday's post I wrote about my affinity for homes that in some way reflect the geographical area that they are in. Continuing with that thinking, I also believe that the interiors of homes should reflect the style of the outside of the home. It is always best to work with, not against, the architecture of your space. For example, if a house has modern architectural lines, decorating the inside with ornate and very traditional furnishings will make the home feel "off", no matter how well done. The flip side is tougher- many of us have older, traditional style homes but want to live in contemporary fashion. Updating to all the modern conveniences that we want can be done while still staying true to a home's architectural style - it just takes a little creativity. Use the architecture as a jumping off point, add in the modern and comfortable elements you want, and accent in a fashion suiting the house style.

A great example of this is the vacation home of my uncle and aunt in Eastern Canada.


They have a rustic log home, and though they live a modern and contemporary lifestyle, they renovated and decorated the interior in a way that stays true to a country log cabin aesthetic.


Red is an unexpected punch of colour and works well with the modern black appliances and the newly painted black hutch. The ceiling is clad with plank boards to keep the country-cozy feel, also accomplished by displaying antiques and collectibles on open shelving. Today's everyday kitchen things are out on display and easily accessible, but the old jars and baskets are mixed in with them to add charm.


Natural materials throughout are consistent with the logs used for the home's frame. Family items found in the house were brought out and used for decoration instead of buying new artwork or decorative items.


Trim around windows and floors needed replacing, and the new ones were square-cut and stained to keep the wood look. Even needed new furniture like this side table keeps the look of the rest of the home. 


The bathroom counter was made by hand from wood. The rich dark colour is amazing and complements the modern nickel accents. Check back tomorrow to see how it was done!


Isn't this a fabulous reno? Do you agree that a home's decor should stay true to its roots?

Thanks Larry and Jill for giving us a glimpse into your wonderful home!

friday favourites!

I just love the rustic modern style and I'm so glad that it is making a big splashy return all over the world of design. Just look at this fantastic renovated Spanish farmhouse, posted by The Style Files. I am in love and booking my ticket to Spain...


bathroom refresh

Hi all. I wanted to show you another of my refresh projects while visiting my family and friends in East Coast Canada. This bathroom is in a '60's bungalow with the original hand-made cabinets (painted many times over) and built-in shelving unit.  This had to be a low-cost makeover, so no new cabinetry or countertop. But some paint and a few key additions like wainscotting made a big difference.

Here's what we did:
-new tile floor
-added wainscotting (beadboard) panels and painted above
-painted the cabinetry and shelving white
-painted existing light fixture and towel hooks brown
-added a bamboo roman shade
-hung a new white waffle weave shower curtain

Keeping things white with natural accents really ups the wow factor. Low cost and high impact, don't you think?


Got any good tips for a budget friendly bathroom makeover? 

Check out this and other great projects over at:

a beach cottage
The Shabby Nest

Chic on a Shoestring Decorating


Roomspiration

the importance of a concept

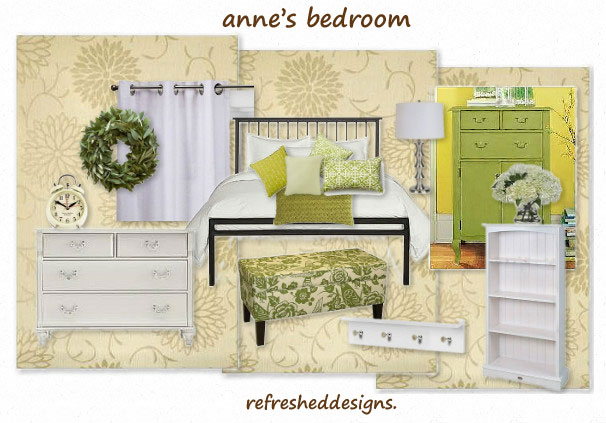
Designing and decorating a room requires creativity and vision, and this can sometimes be even tougher when redecorating. It is easy to hit an inspiration roadblock when looking at an existing room with existing furniture, and getting off track in the middle of the project can often happen. That's why it is so important to map out a concept for the room from the beginning. Creating a design board with the colours and furniture you will use allows you to constantly go back and be reminded of the feel and mood you are trying to achieve. I always start with something that the homeowner loves, and use that as a jumping off point. It might be fabric in a favourite colour, a piece of art, or a decorative accessory.

Here is an example of a recent project I did, which I posted about this week. This was a master bedroom refresh, using much of the existing furniture. The design board shows the colours and feel we were going for, and although some things were tweaked, it kept us on track and the outcome was what we wanted.


If you would like to have a design board created for a room you would like to refresh, go to my online refresh page. I would love to help out!


master bedroom refresh

Well I"m back in Calgary after two fantastic weeks on the East Coast at "home" visiting family and friends. I was busy while there, and one of the projects was refreshing my mom and dad's bedroom. The budget was slim to nil on this one, so I had to get the creative juices flowing. I started with wallpapered walls and a lovely wood floor, a bed with black iron-look head and foot board, and two tired old dressers. And it was quite dark, with only one window facing east.

I was very excited to see what was possible by using the sustainable design concept of reusing and re-purposing. Here is the before picture...


And after...


I wanted to create a brighter, lighter feeling country bedroom. The dresser below was painted a dark sage green (see my previous post on painting the dressers in this room). The curtains were an old shower curtain cut in two to make panels.


Everything on the walls and shelves was either something already in the house or from the yard outside. Birch branches are leaned against the wall as a point of interest and to cover up a bad crack in the wall underneath the wallpaper.


This is the second painted dresser with matching grey-green paint on the back of the existing shelves.


Jewellery is displayed on an old picture frame with a ribbon tied across the back.


The head and foot boards were painted with white semi-gloss trim paint and then distressed with sandpaper.


This bench was an old deacon's bench. We sawed off the back spindles and side arms, painted it out white, and made a foam cushion for the top.


The side table is a block of firewood sawed and sanded with a Varathane finish. 


Snowshoes complete the country feel and were found in the basement, so again, no extra cost for decoration.


This project cost only $100 dollars - for paint and fabric for the cushions. The rest was all re-purposed and reused.  I'm pleased with it, and so are my parents. What do you think?

Stay tuned for more budget-friendly refreshed rooms- including the bathroom and kitchen.